Basic Wallet Operations
Estimated time to read: 11 minutes
This guide covers basic Arcana wallet operations that are accessible through the user interface.
Arcana wallet Access
Users can access Arcana wallet from within the app's browser context. The app must be integrated with the Arcana Auth SDK to enable Arcana wallet for the user.
Minimize/Maximize UI
Right after a user authenticates, the wallet is displayed in its minimized state.


On clicking, it expands to display the wallet in its maximized state. It can be minimized again by clicking the '∨' icon on the top in the wallet UI.


Switch Wallet Tabs
The following functions can be accessed from any of the wallet tabs:
- View the dApp name, logo
- View wallet address and type
- View/Switch/Add Blockchain Network
- Copy wallet address
- Display QR code for the wallet
Other wallet features can be accessed via specific tabs in the wallet UI:
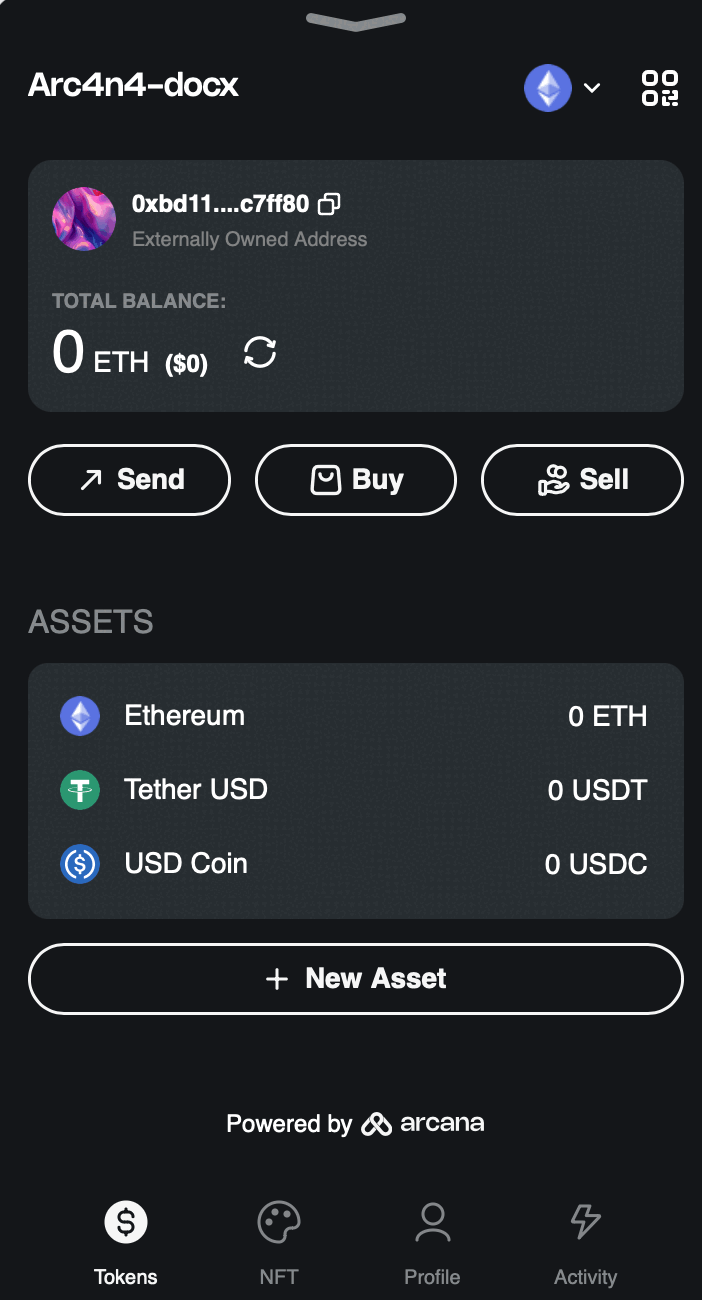
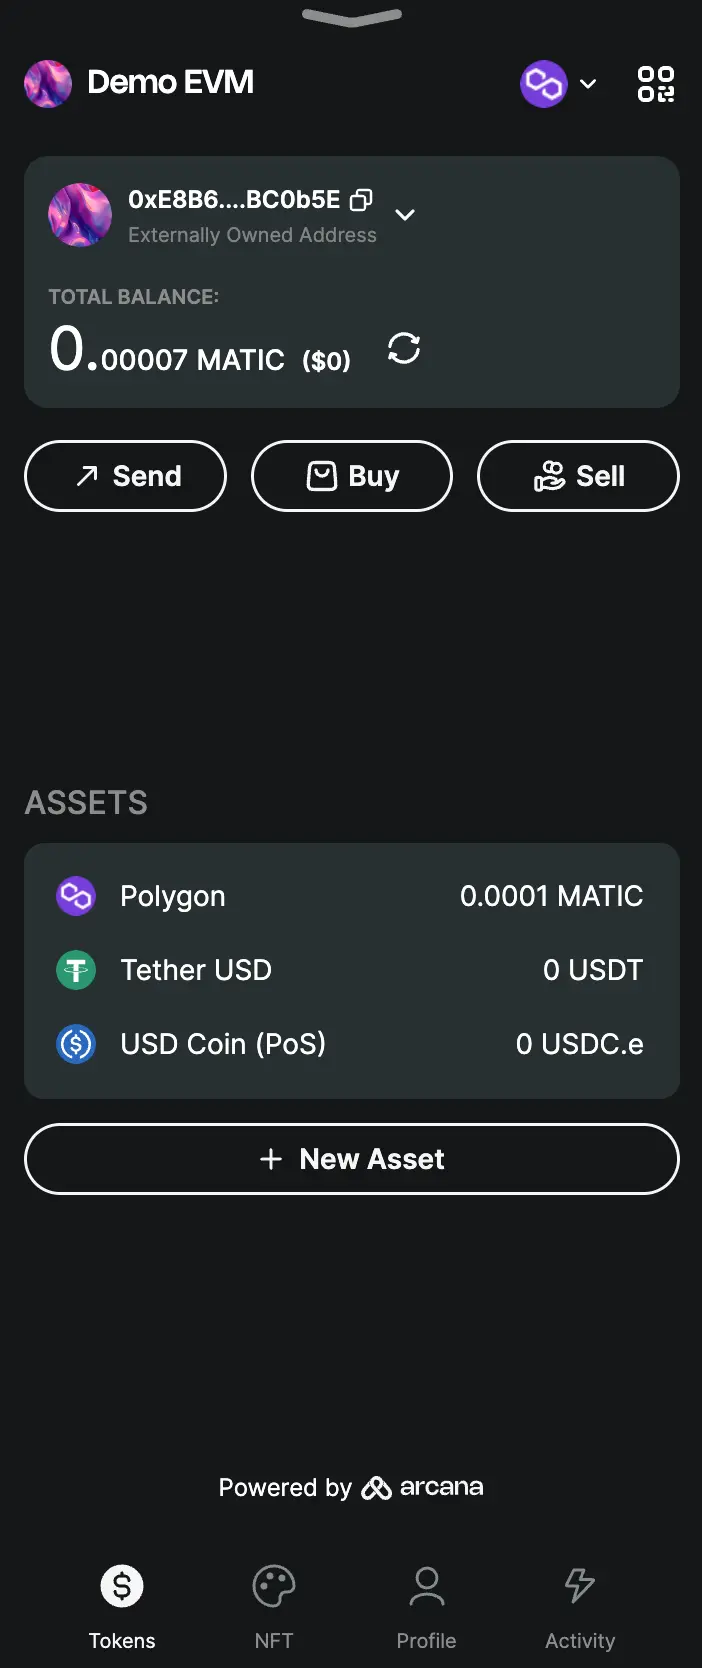
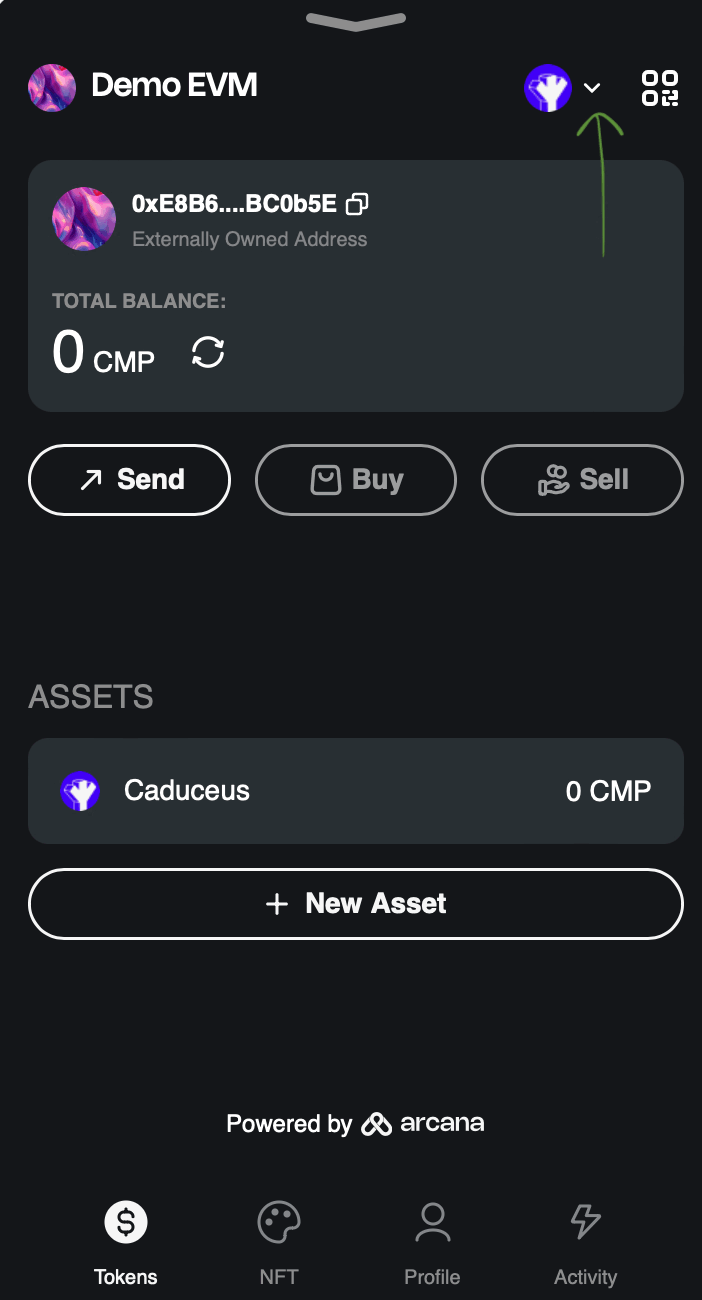
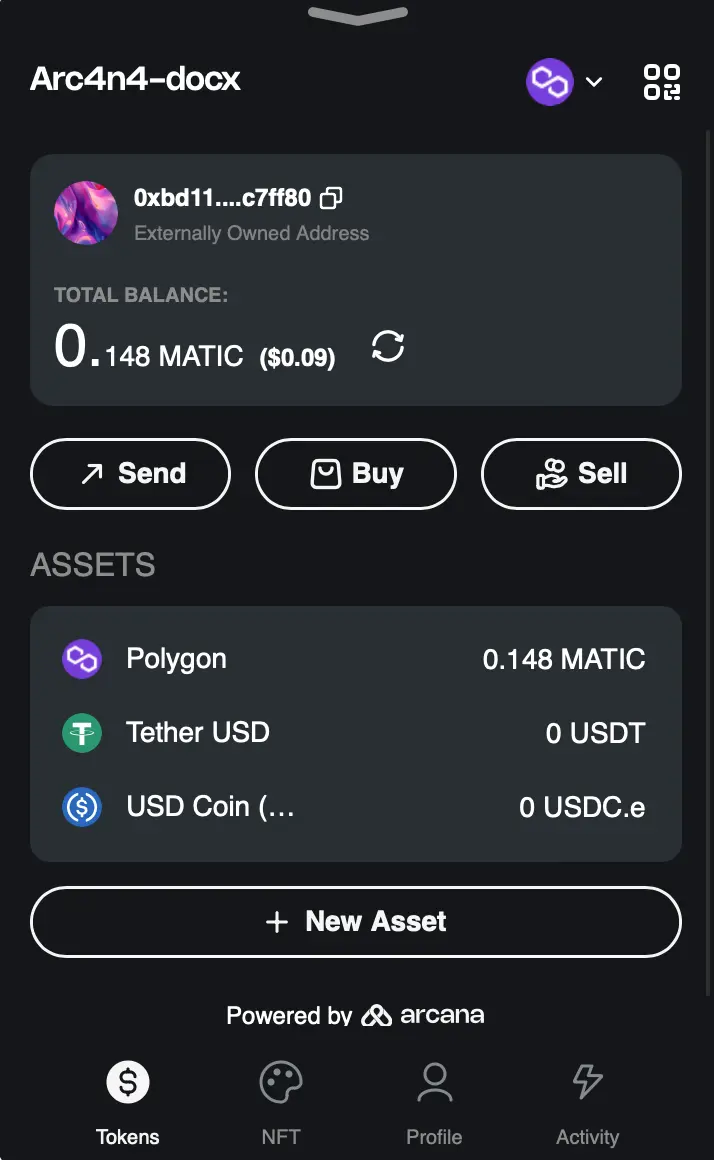
This is the default home tab of the Arcana wallet: ![]()
![]()
It displays the wallet token balance across available chains. User can switch chains, send cryptocurrency and tokens, buy/sell cryptocurrency and manage ERC-20 tokens. See #view-wallet-balance for details.
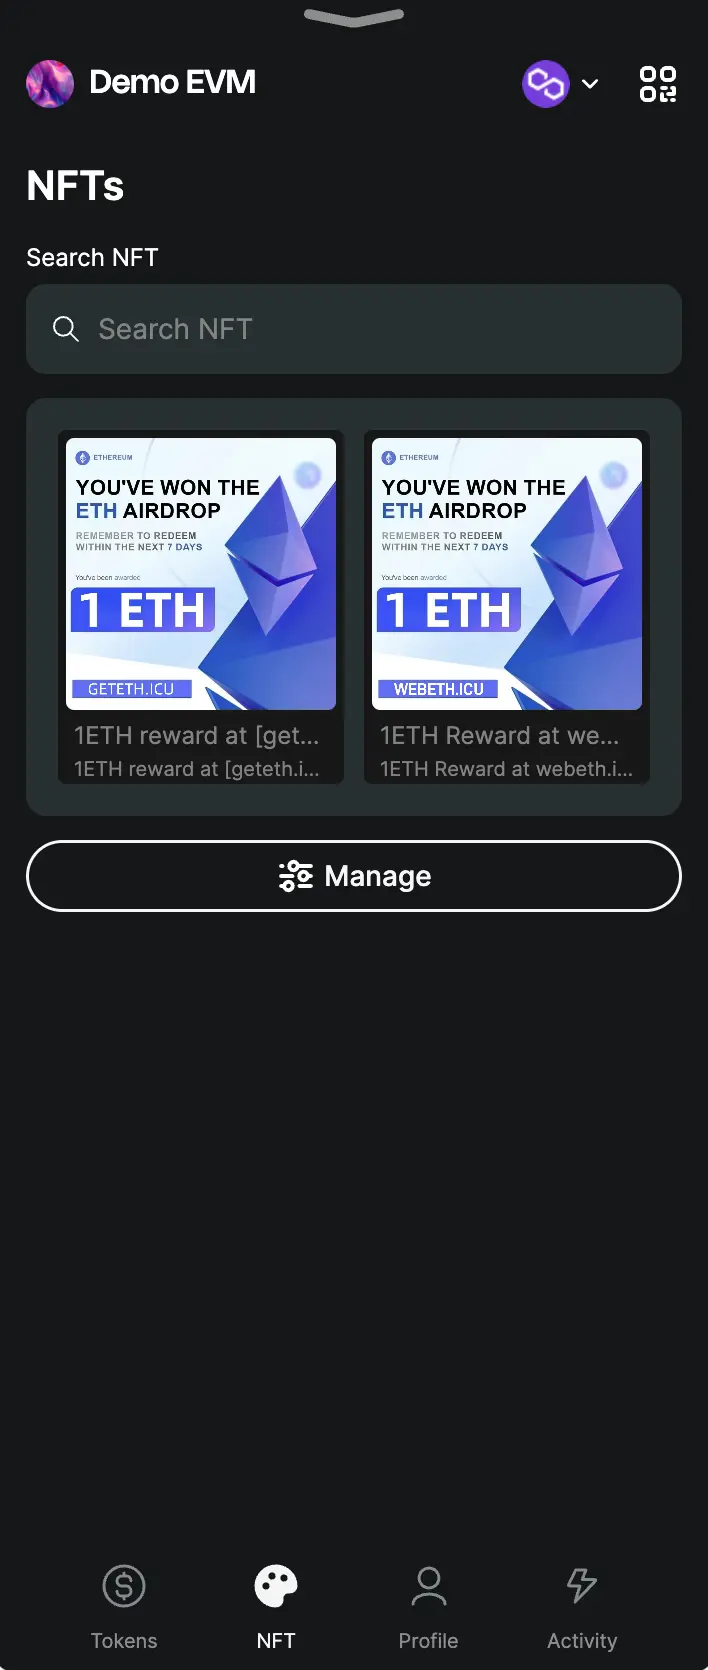
Use this tab to view the NFT assets linked with your Arcana wallet on the selected chain: ![]()
![]()
See how to manage NFTs, for details.
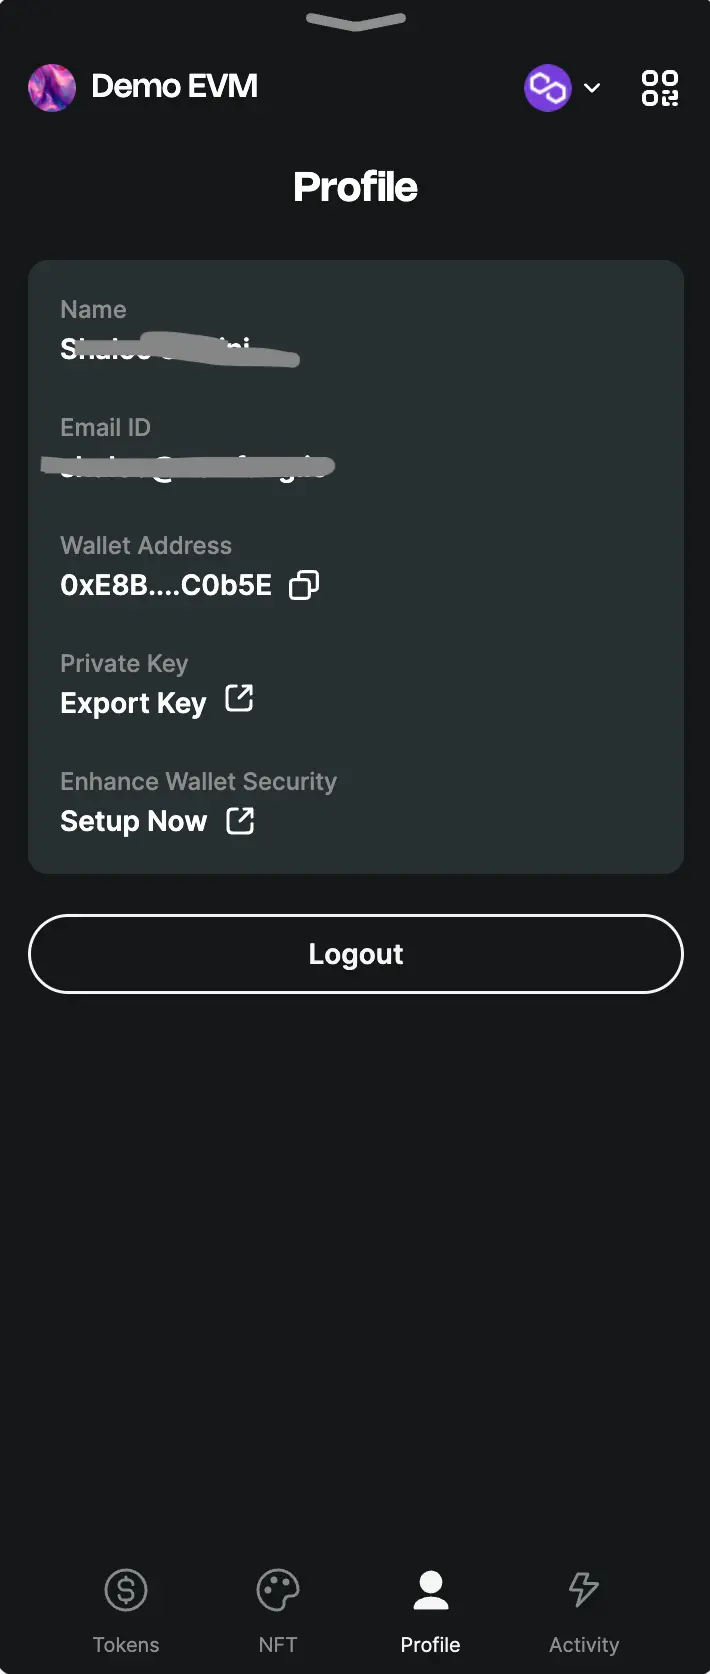
View your user profile details associated with the Arcana wallet in this tab: ![]()
![]()
You can view wallet address, export private keys, check MFA status (or enable it) and log out of the wallet through this tab.
See how to export private keys for details.
Multi-Factor Authentication (MFA)
MFA is a one-time setting. See how to ensable MFA, for details.
Check your Arcana wallet activities through the activity tab: ![]()
![]()
It shows the wallet activity, transactions processed in the current user login session. Learn more...
View Wallet Balance
Add/Select a Network
By default, the Arcana wallet UI displays a pre-configured list of blockchain networks that are configured by the app developer. Users can select a different network from the drop-down list or add newer networks that are supported by the app.
To add or select a network, click the dropdown next to the blockchain network icon on the top right: ![]()
Choose one of the available networks in the list and switch to it or click Add Network to add a new one with the following details:
- Add the following details:
- Network Name: Name of the network. For example, Shardeum
- RPC URL: https://liberty10.shardeum.org
- Chain ID: 8080
- Currency Symbol: SHM
- Explorer URL (Optional): https://explorer.liberty10.shardeum.org/
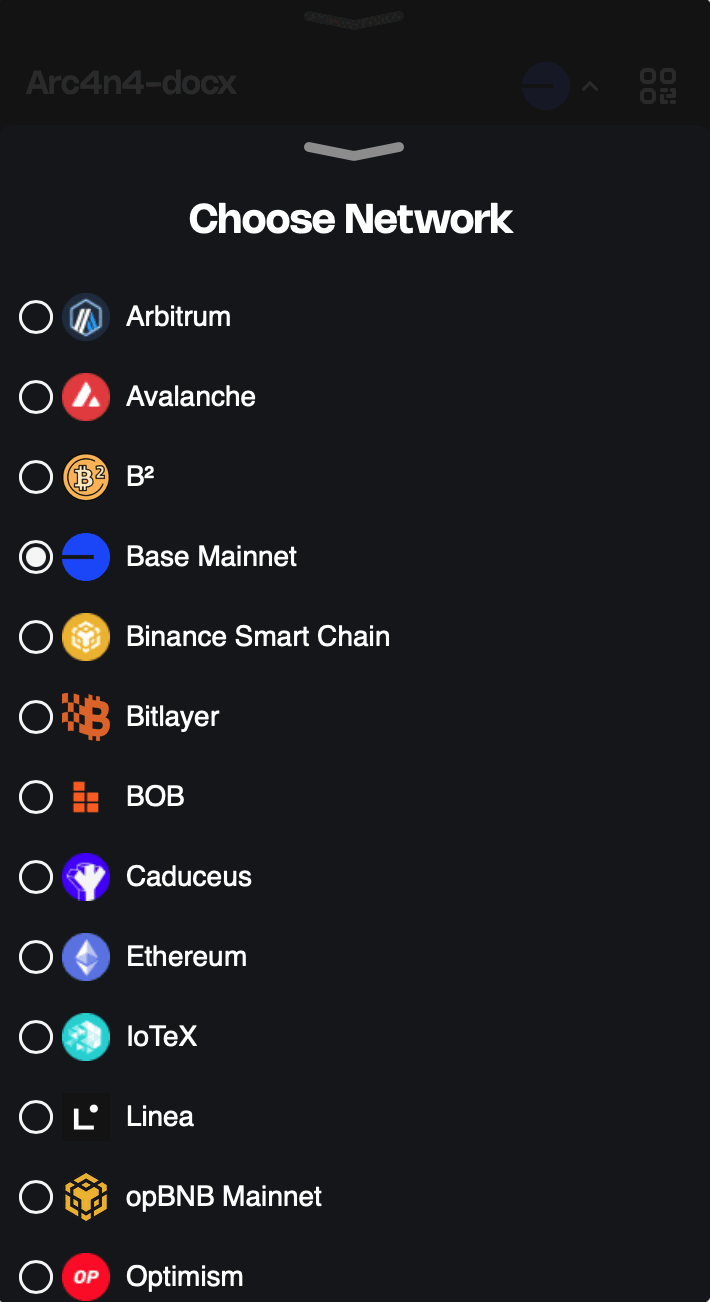
Click Save to automatically set the newly added network as the active chain in the wallet UI.

Switch Network
Click on the dropdown next to the network icon on the top right of the wallet UI:![]()
![]()
Choose one of the available networks in the pre-configured blockchain networks list to switch networks.
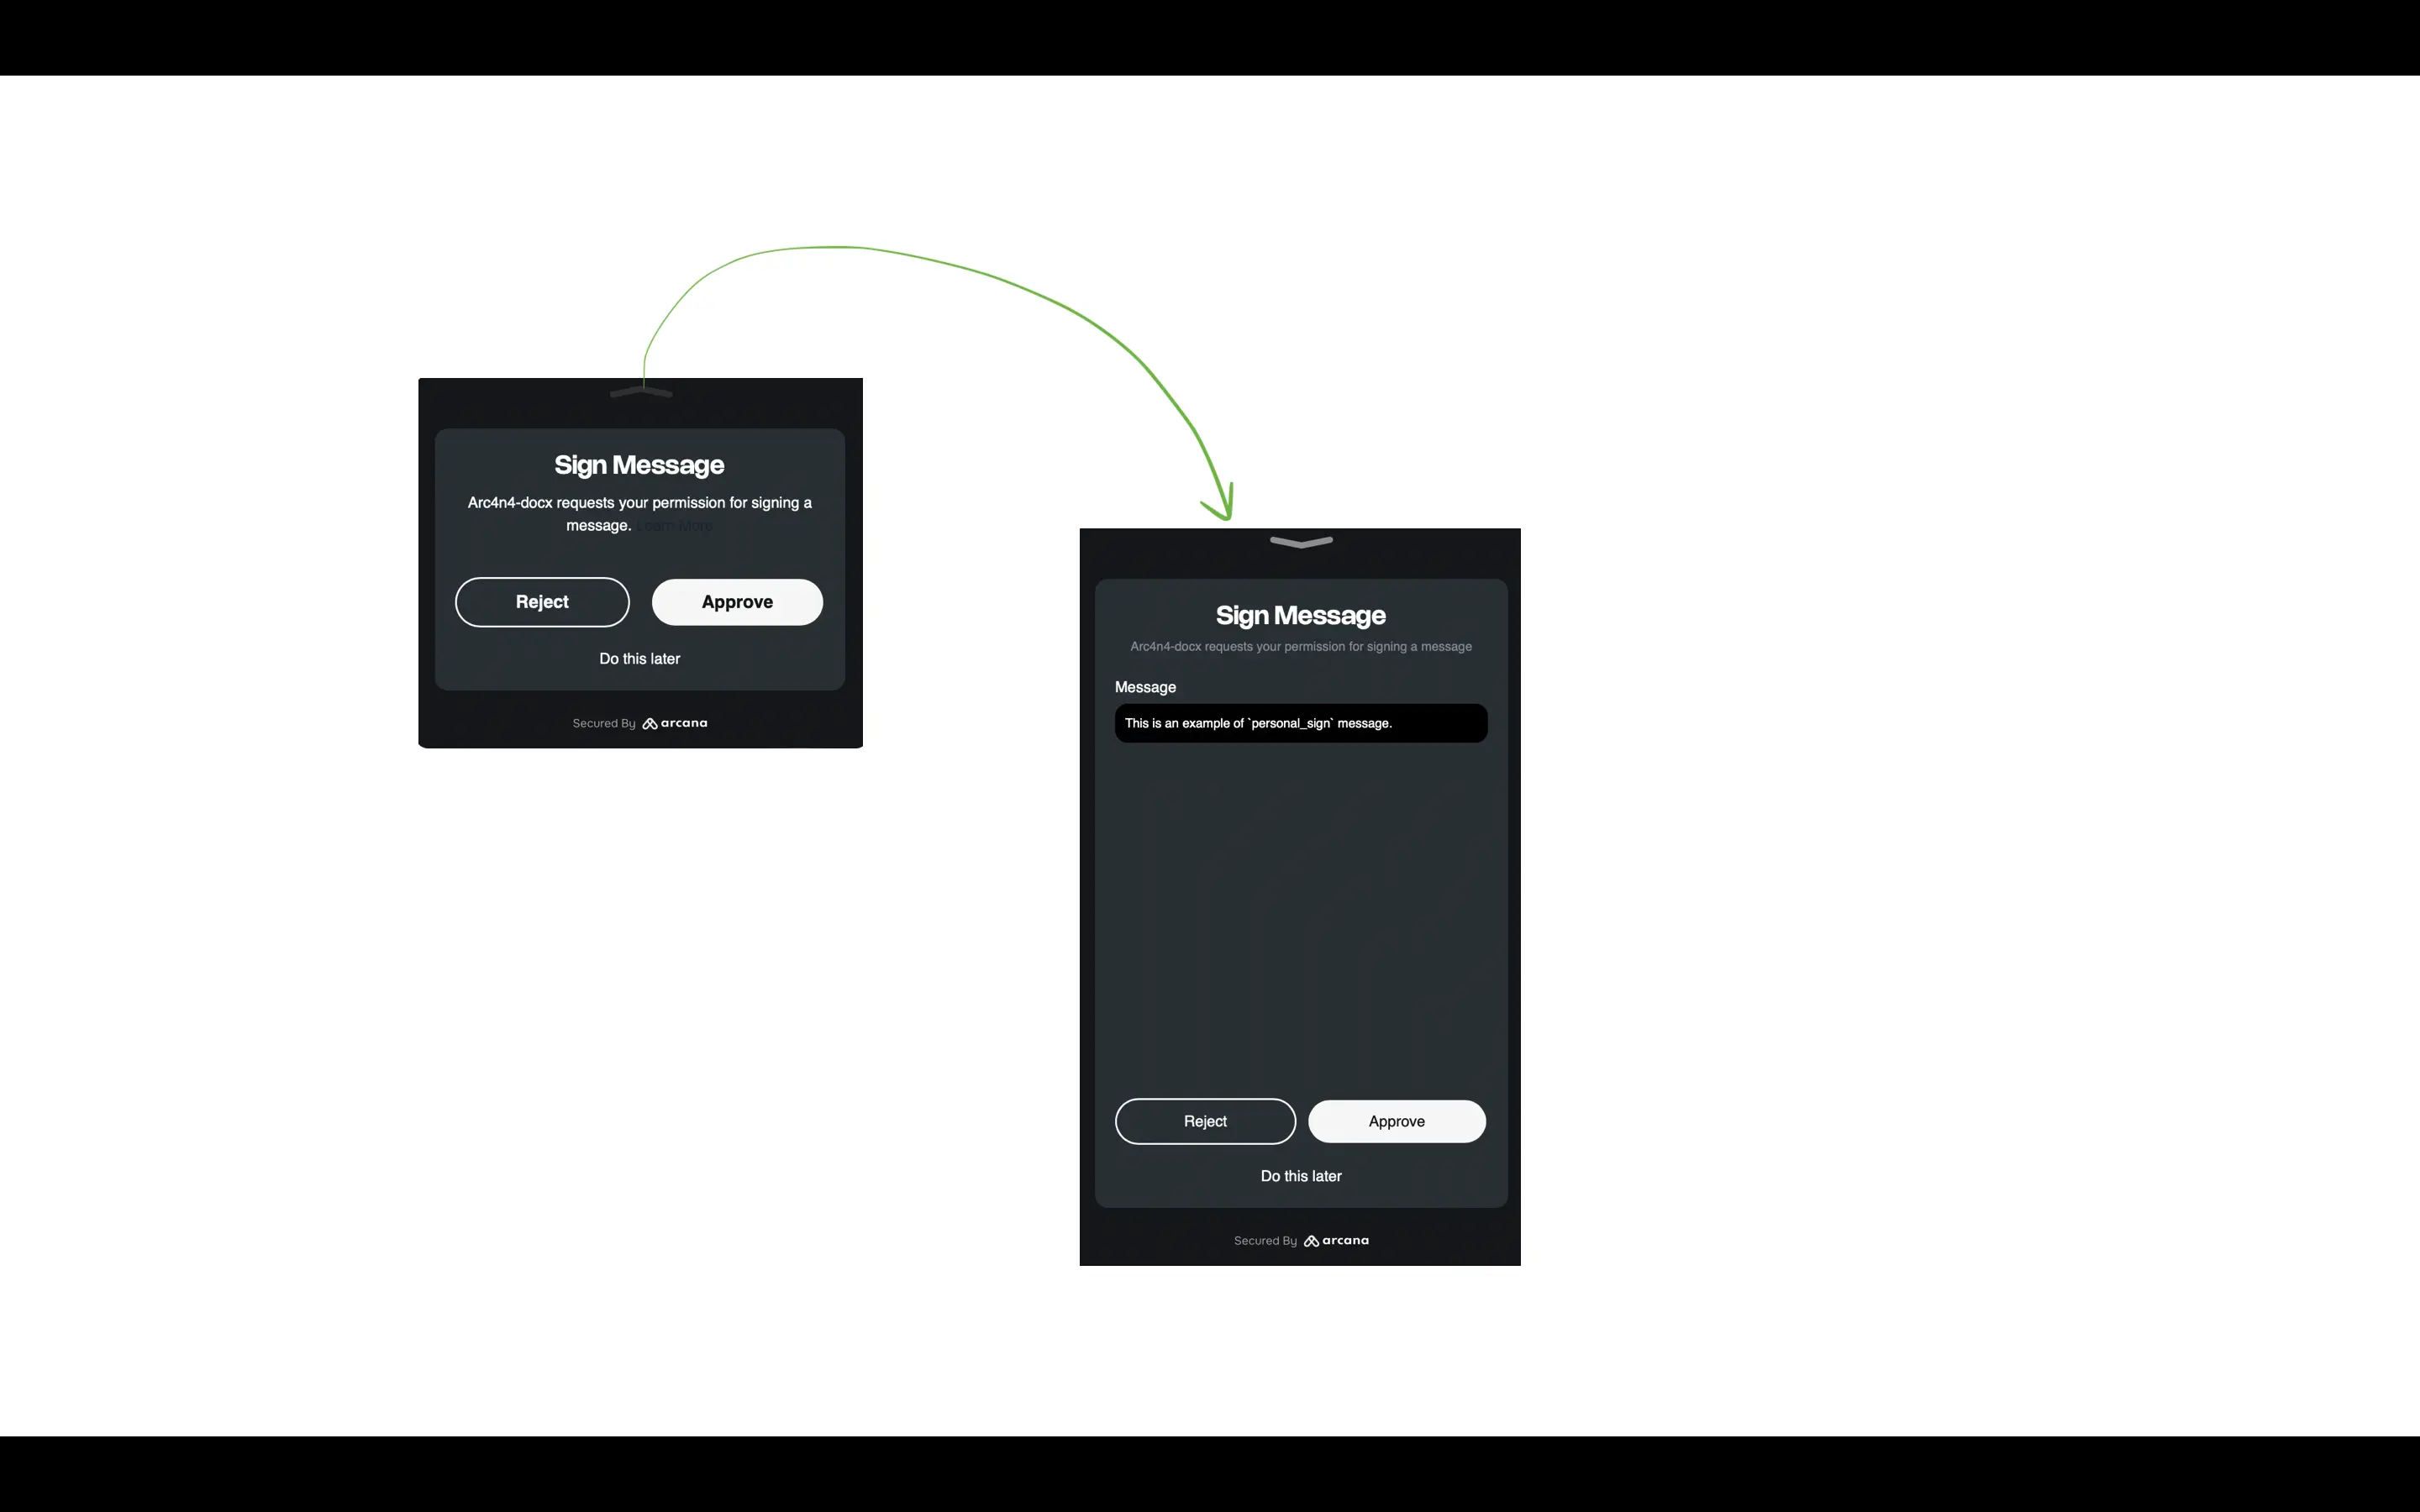
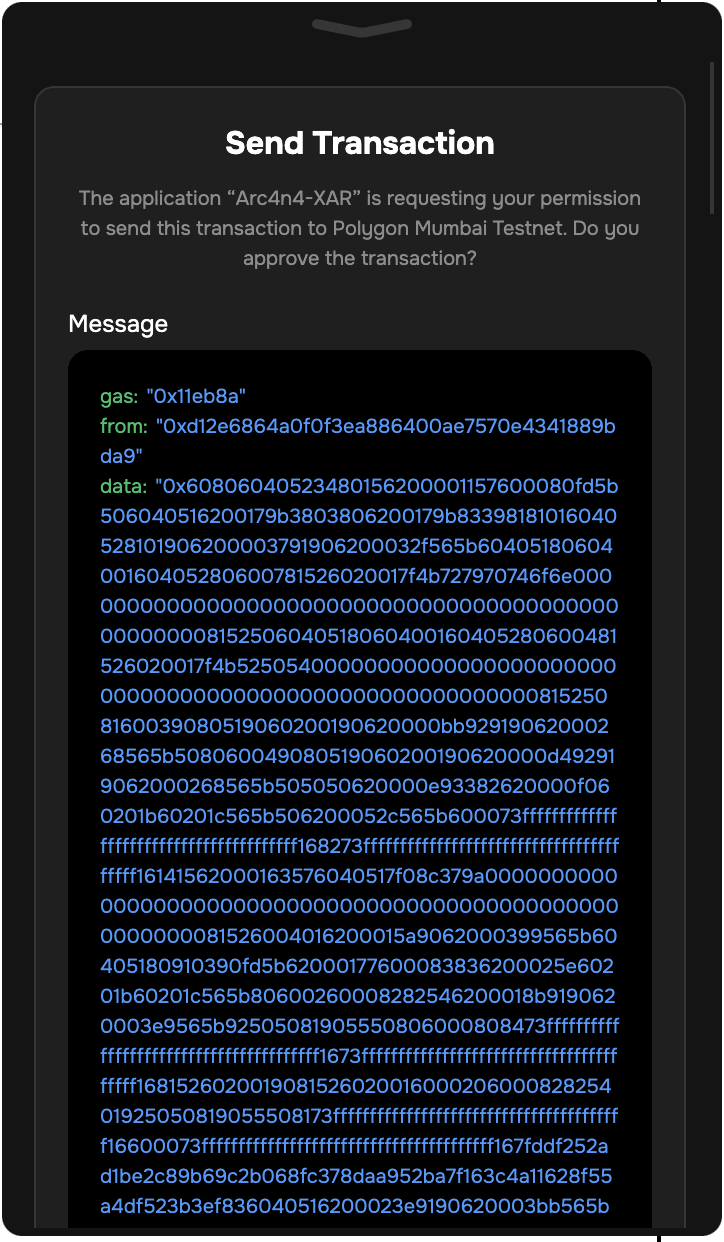
Sign Transaction
A blockchain sign transaction notification can be triggered programmatically via the app or in response to a user action in the Arcana wallet UI. Users can scroll through the notification to view the details before selecting Reject or Approve option.
Speed Up Transaction
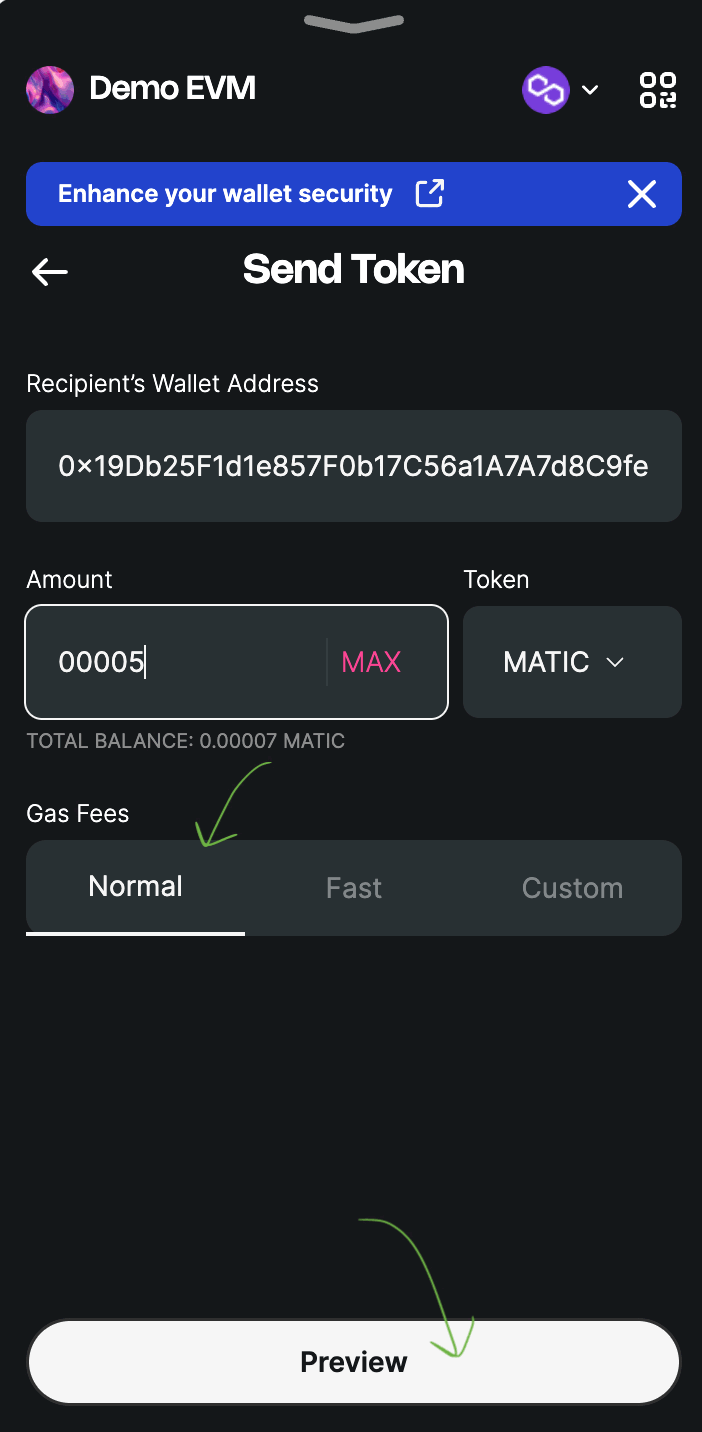
For every blockchain transaction, users pay gas fees with the network’s native token. It is possible to speed up the transaction by paying higher gas fees. When issuing a send transaction through the Arcana wallet UI, users have three options for gas fees selection:
- Normal: Default network gas fees
- Fast: Pay a premium for quicker transactions
- Custom: Choose gas limits, priority fee and max gas fees setting and customize fees
Transaction Details
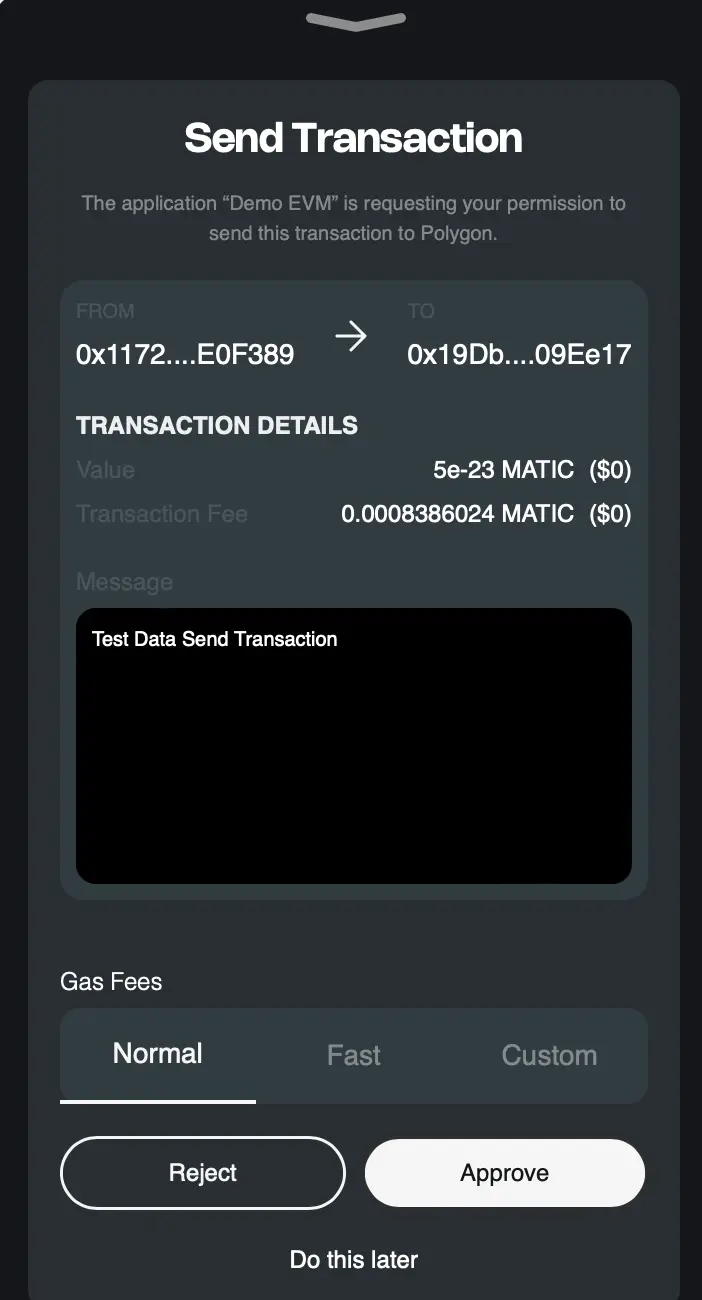
If a blockchain transaction is triggered via the app that requires the user's approval, the user will see a transaction notification. If the wallet was in a minimized state at the time the request was generated, then the notification will show up with a summary of the transaction along with the buttons to approve or reject.
The user can click on the top right arrow icon in the transaction notification to view its details.

Transaction Notification Example
Here is an example of how an eth_sendTransaction triggers a transaction notification and approval request for the user. The send transaction notification summary is displayed:
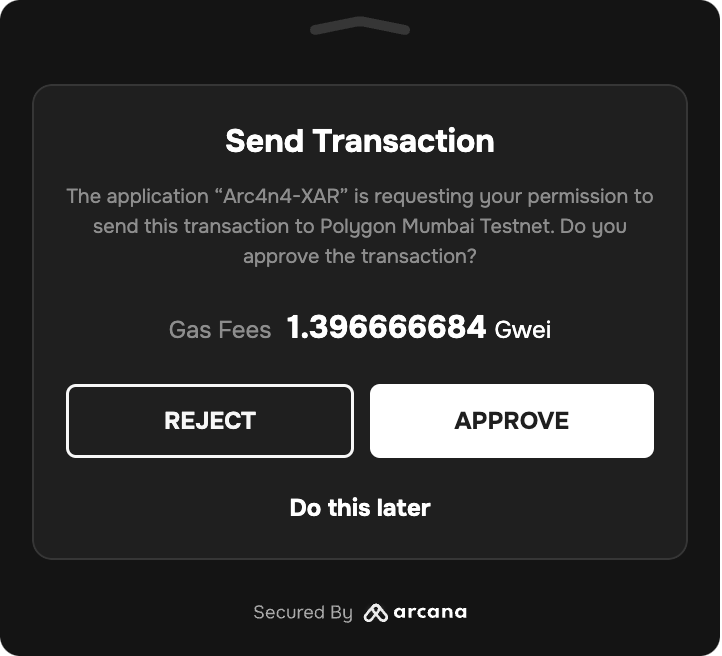
In the case of the send transaction request or sign transaction request, the notification details allow the user to edit the gas fees before approving the request.
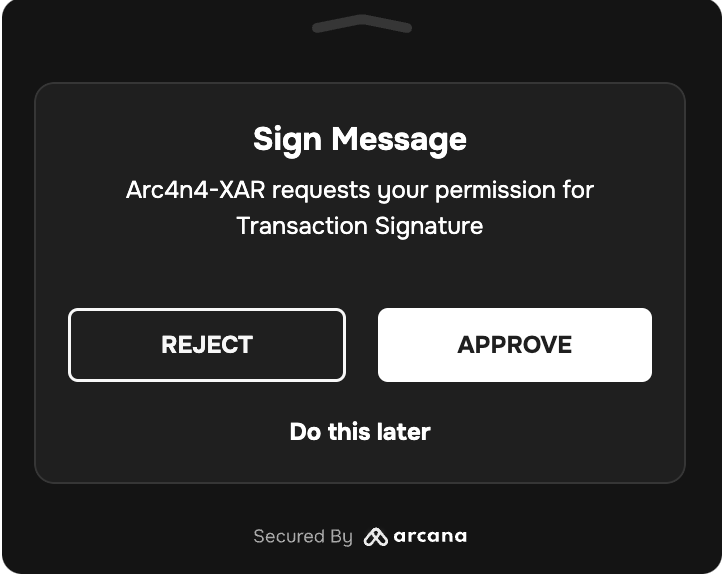
For other transactions that do not involve gas fees such as personal sign or signature requests, the notification details allow users to review transaction message details before taking an action to approve or reject.
Signature Request Example
Here is an example of a signature request notification summary:
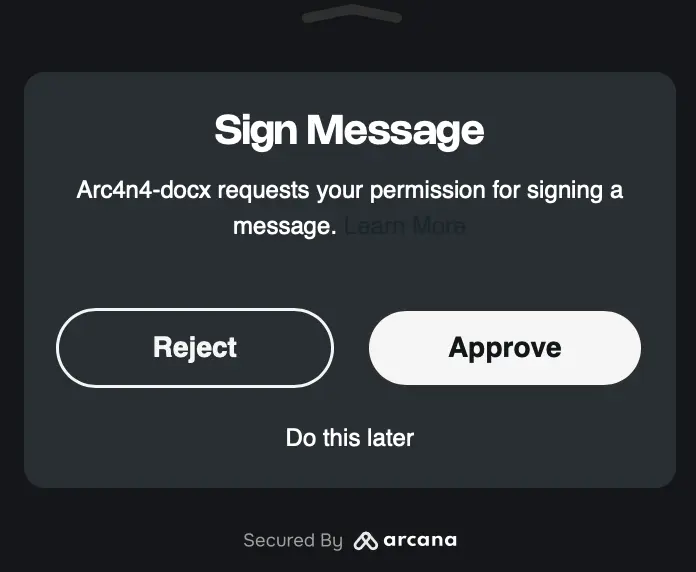
On clicking the topmost arrow icon, the user can see the signature request transaction notification details view:

Buy/Sell Crypto
Arcana wallet uses third-party providers to enable buying and selling (on-ramping and off-ramping) of crypto assets.
Fiat On-ramp
The Arcana wallet users can buy cryptocurrency using fiat through one of the supported providers:
Click Buy to purchase ERC20 or native tokens for supported blockchains from the chosen on-ramp provider. Select the 'Tokens' ![]()
![]() tab, then choose the required blockchain network from the drop-down list. The selected chain determines which cryptocurrencies and tokens can be purchased, following local regulations.
tab, then choose the required blockchain network from the drop-down list. The selected chain determines which cryptocurrencies and tokens can be purchased, following local regulations.
Pick up one of the providers and click Proceed.
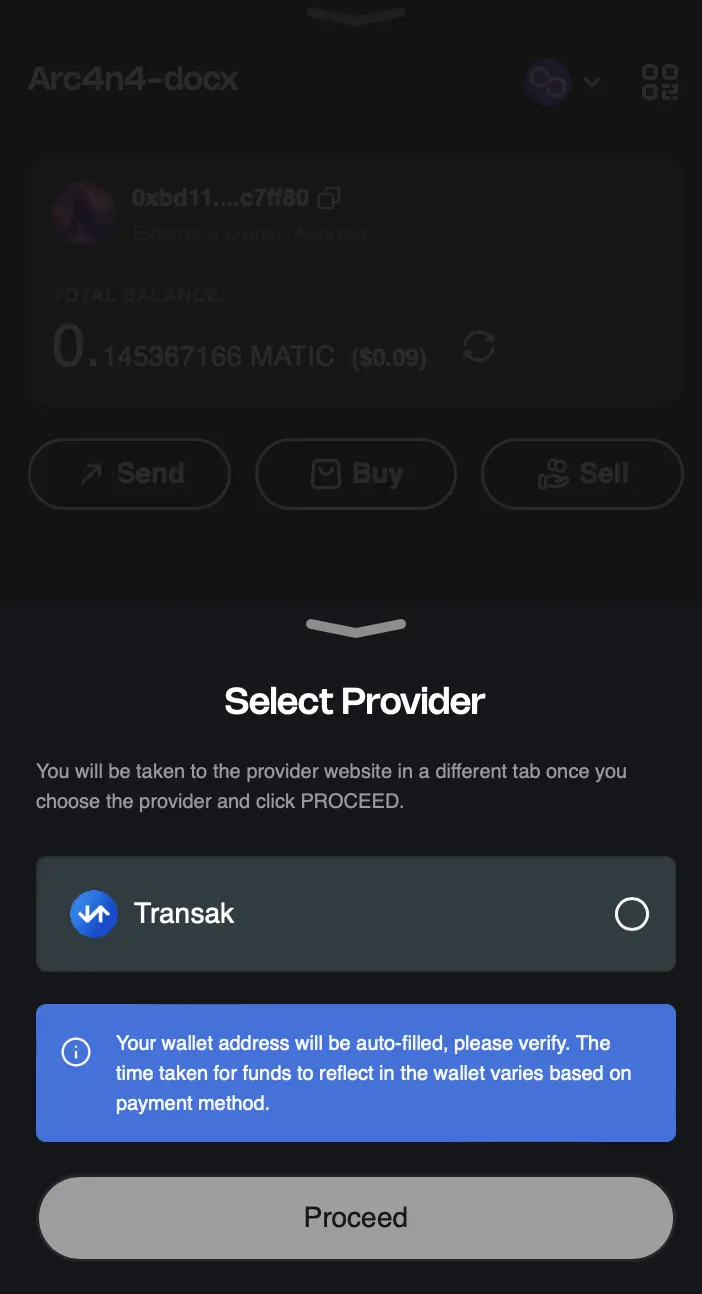
Clicking will open the provider interface in a new tab. Arcana wallet will notify you of the 'buy' process. Dismiss the notification and continue using the wallet while the purchase is completed in the other tab.

On-Ramp Provider Usage
Fiat on-ramp providers may require users to follow country-specific KYC procedures and list only the available cryptocurrencies for the selected chain. Minimum purchase amounts can vary by country and provider.
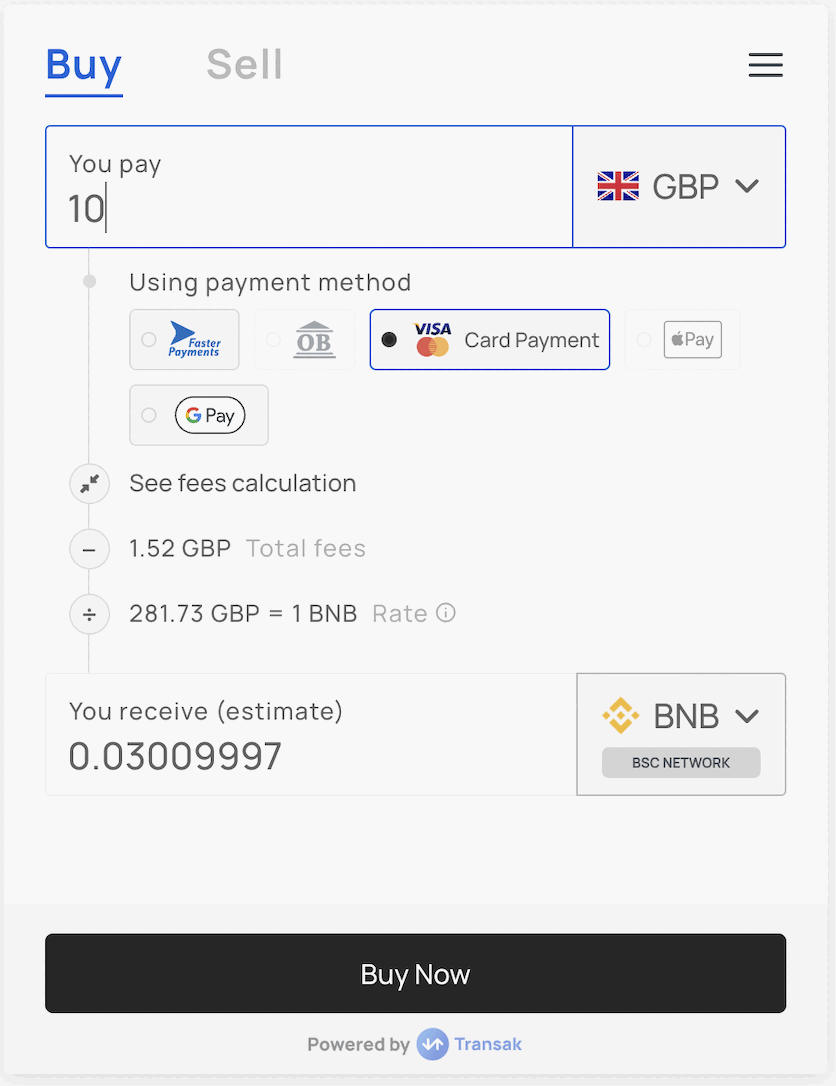
For example, Transak requires each user to complete KYC by submitting country-specific identification documents. Once the verification is complete, the user can purchase the cryptocurrency with Transak. This verification is a one-time thing and subsequent purchases will not require this additional step. The figure below shows an example of a purchase transaction using Transak.
Refer to the provider documentation for details regarding usage and coverage:
Buy Limitations
-
Purchased ERC20 and ERC721 tokens will not update automatically in the Arcana wallet assets screen. Users must manually add custom tokens, as on-ramp providers do not supply the token's contract address.
-
The notification tab in the Arcana wallet UI will not show activity for a successful purchase. On-ramp providers do not consistently share this information. We may add this feature in future releases.
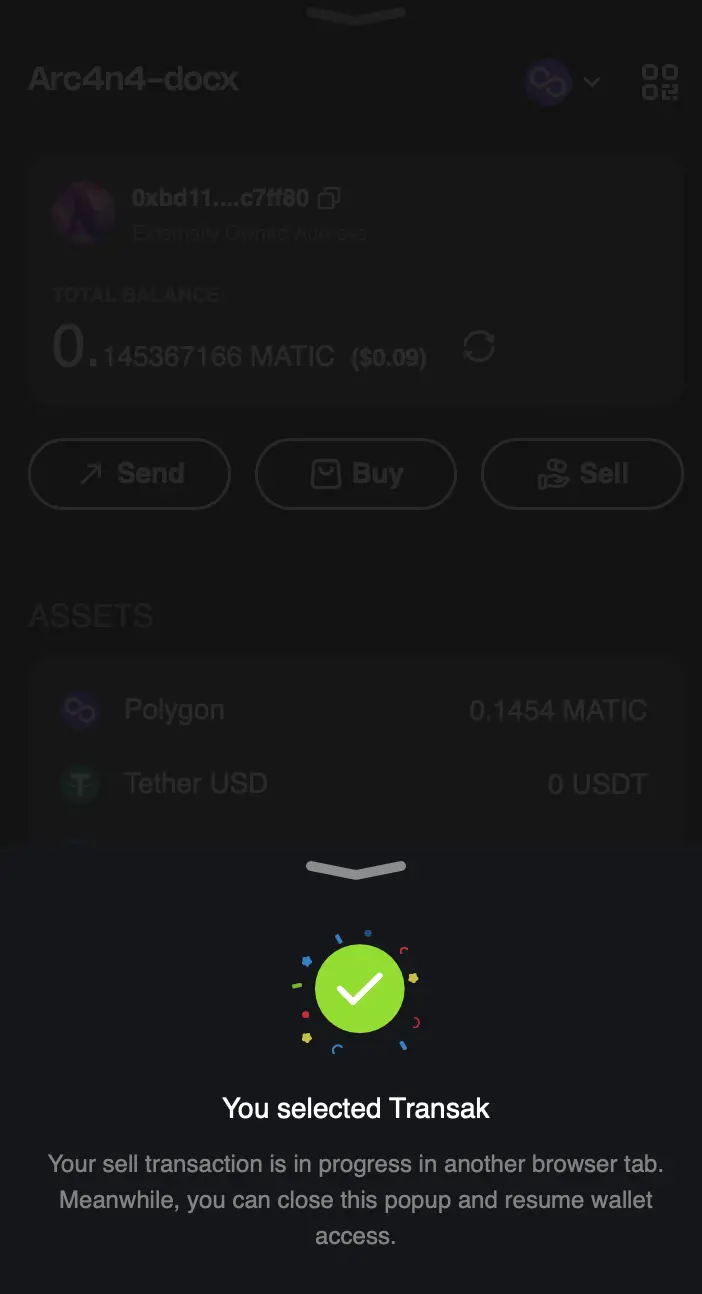
Fiat Off-ramp
The Arcana wallet users can sell cryptocurrency using fiat through one of the supported providers:
Click Sell to off-ramp ERC20 tokens or execute native cryptocurrency sell transactions for supported blockchains via the selected provider. The chosen off-ramp provider executes the 'sell' and deposits proceeds into the configured bank account. Select the 'Tokens' ![]()
![]() tab, then choose the required blockchain network from the drop-down list. The selected chain determines which cryptocurrencies and tokens can be sold, following local regulations.
tab, then choose the required blockchain network from the drop-down list. The selected chain determines which cryptocurrencies and tokens can be sold, following local regulations.

Pick up one of the providers and click Proceed.

Clicking opens the provider interface in a new tab. Complete the sale there. Arcana wallet will notify you of the 'sell' initiation. Dismiss the notification and continue using the wallet.
Off-ramp Provider Usage
Fiat off-ramp providers may ask the user to follow country-specific procedures for KYC and list available cryptocurrencies for the selected chain. Note that the basic maximum sell amount for a country or cryptocurrency may vary across countries and providers.
Transak requires each user to complete KYC by submitting country-specific identification documents. Once the verification is complete, the user can sell cryptocurrency via Transak. This verification is a one-time thing; subsequent purchases will not require this additional step. The figure below shows an example of a sell transaction using Transak.
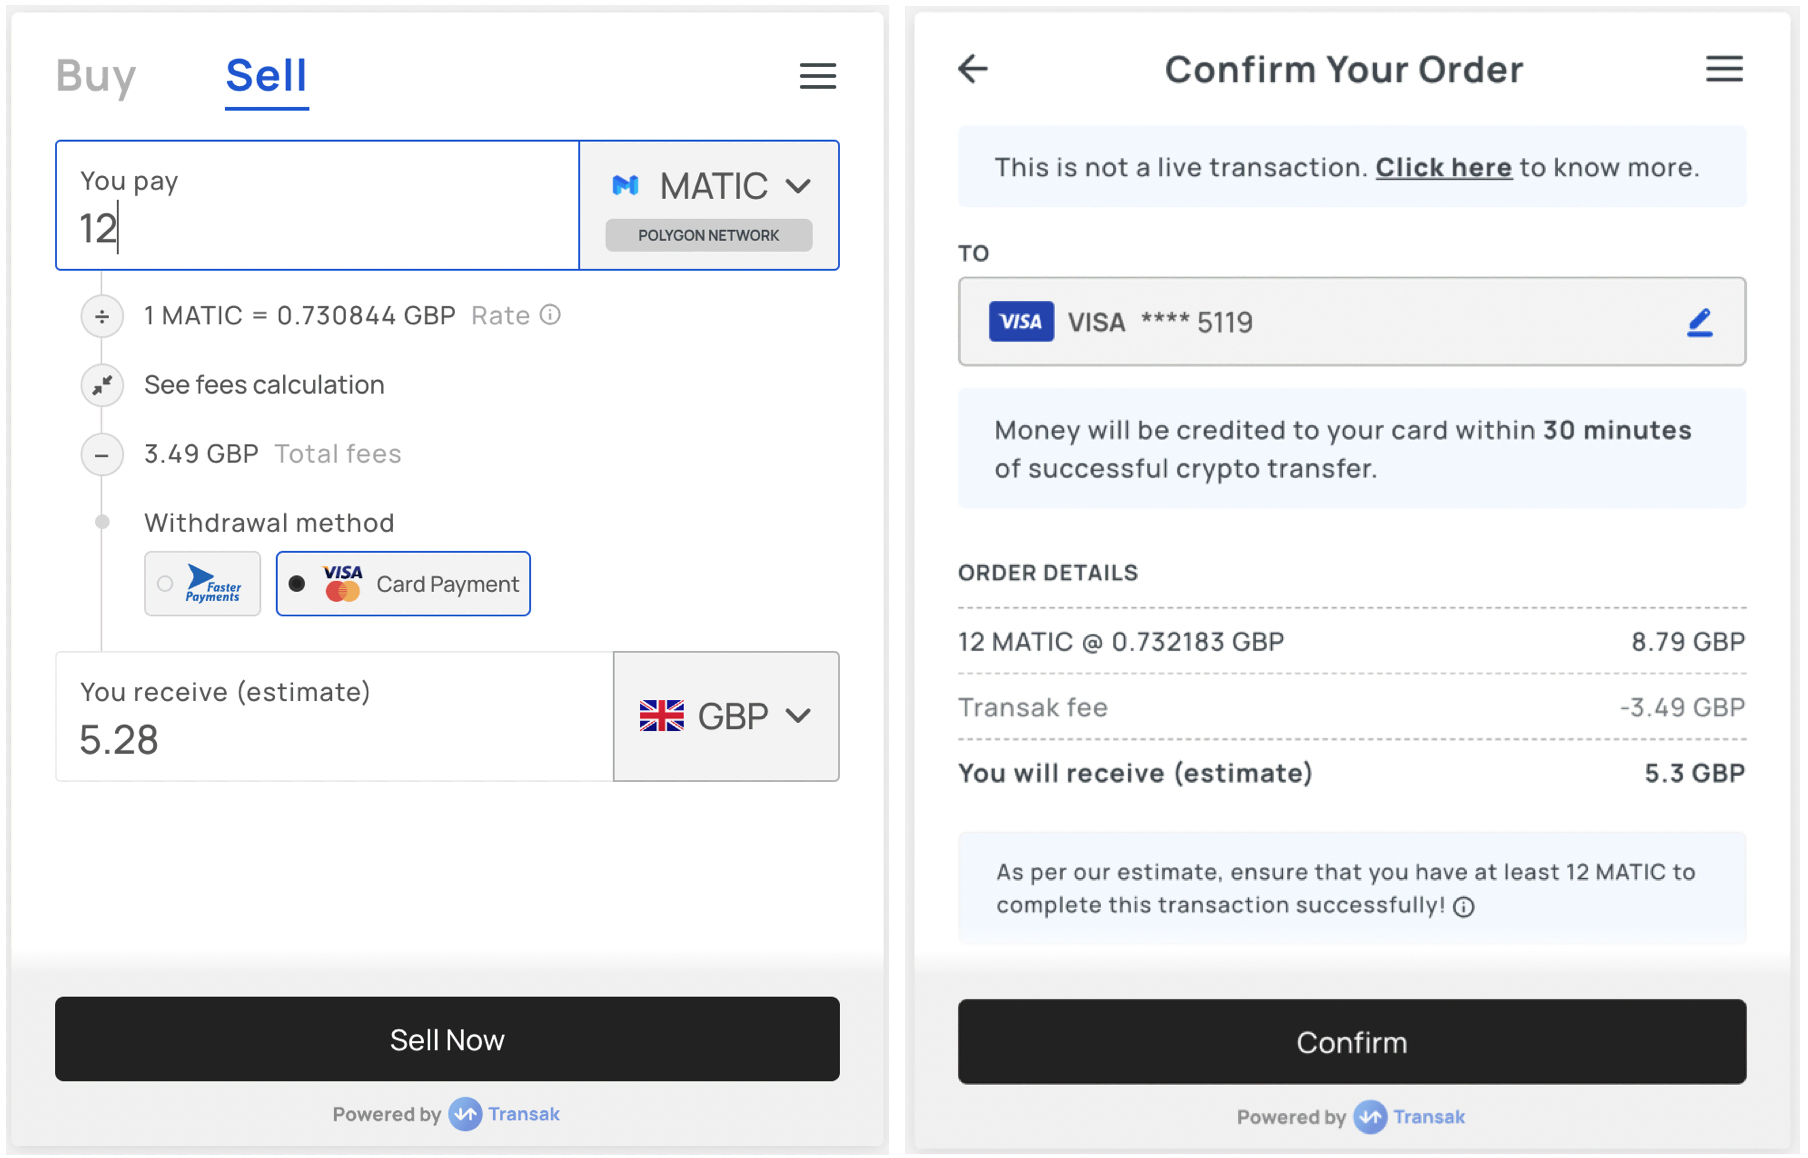
Refer to provider documentation for more details on usage and coverage.
The activity tab in the Arcana wallet UI displays details of the 'sell' transaction issued from the wallet.
Add Tokens
Click the ![]()
![]() 'Tokens' tab on the bottom left of the Arcana wallet to bring up the token assets screen.
'Tokens' tab on the bottom left of the Arcana wallet to bring up the token assets screen.
You can add custom ERC-20 and ERC-1155 token assets to the Arcana wallet UI by clicking Manage. Learn more...
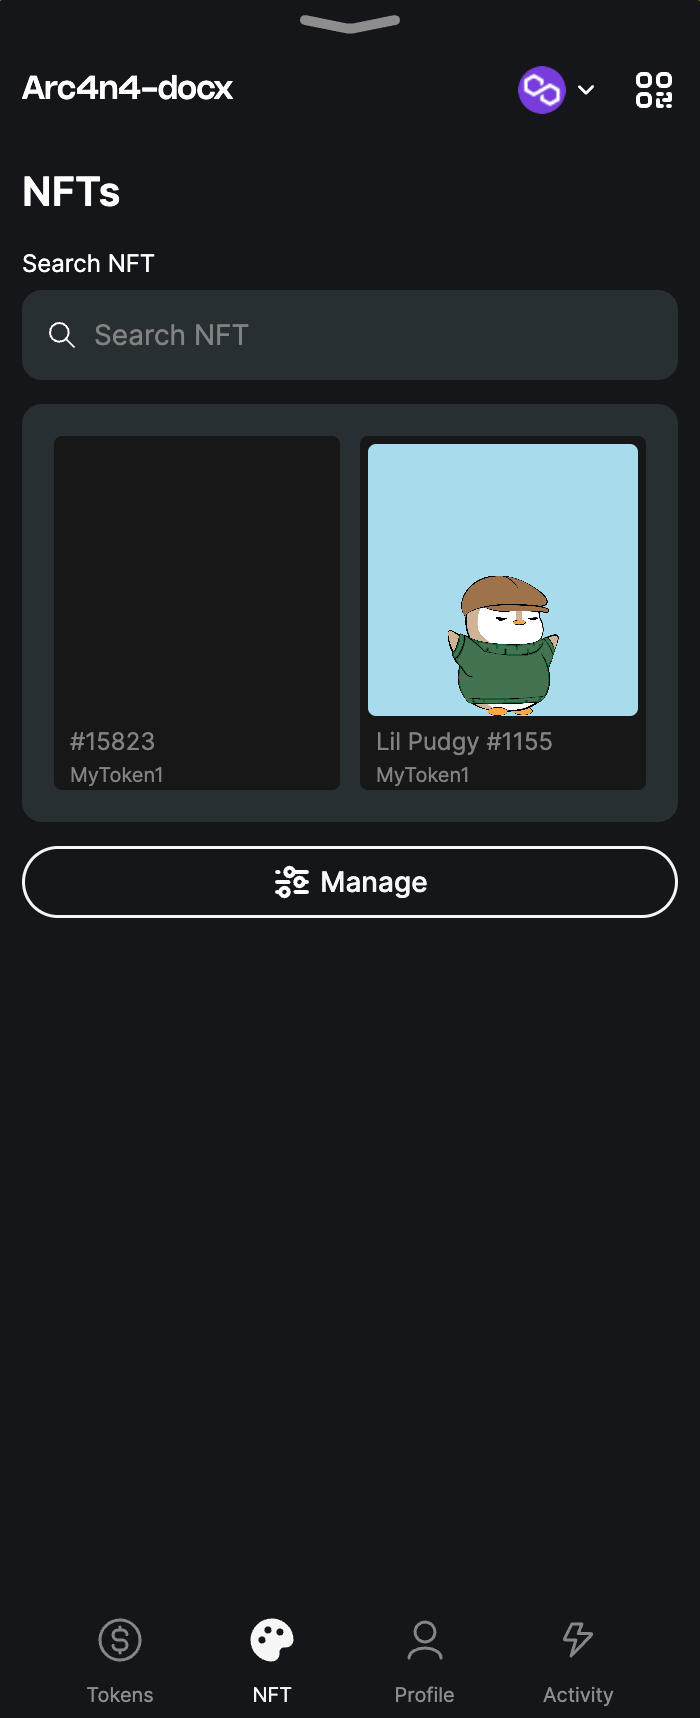
Manage NFT Assets
Click the 'NFT' tab on the bottom of the Arcana wallet UI to view and manage NFTs associated with the wallet address on the selected blockchain network and perform these actions:
- List NFT assets associated with the wallet address
- View NFT details
- Send NFT
- Receive NFT
-
Manage NFTs
- Add an NFT
- Edit NFT entry
- Delete NFT entry
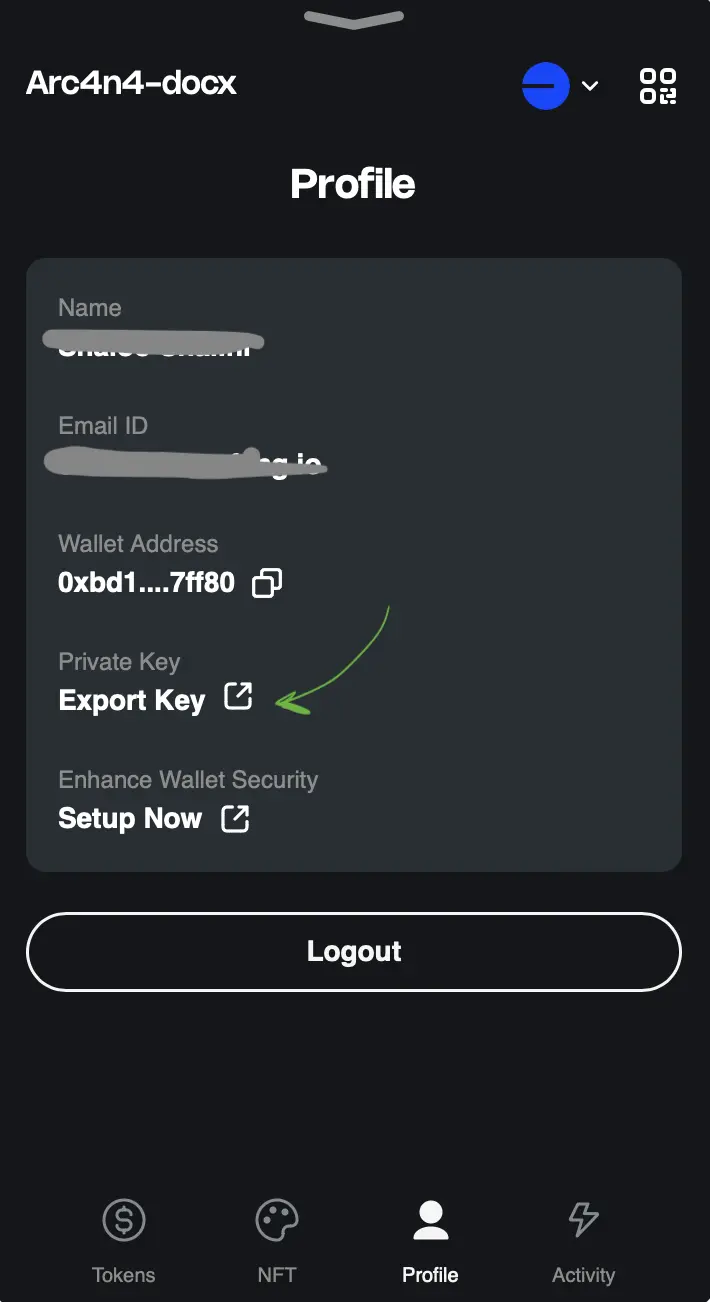
View User Profile
Click the ![]()
![]() 'Profile' tab on the bottom of the Arcana wallet and perform these actions:
'Profile' tab on the bottom of the Arcana wallet and perform these actions:
- View User name
- View User Email ID
- View / Copy Wallet Address
- Export the private key / Save seed phrase for exporting MultiversX wallet
- View MFA Status / Enable MFA
- Logout
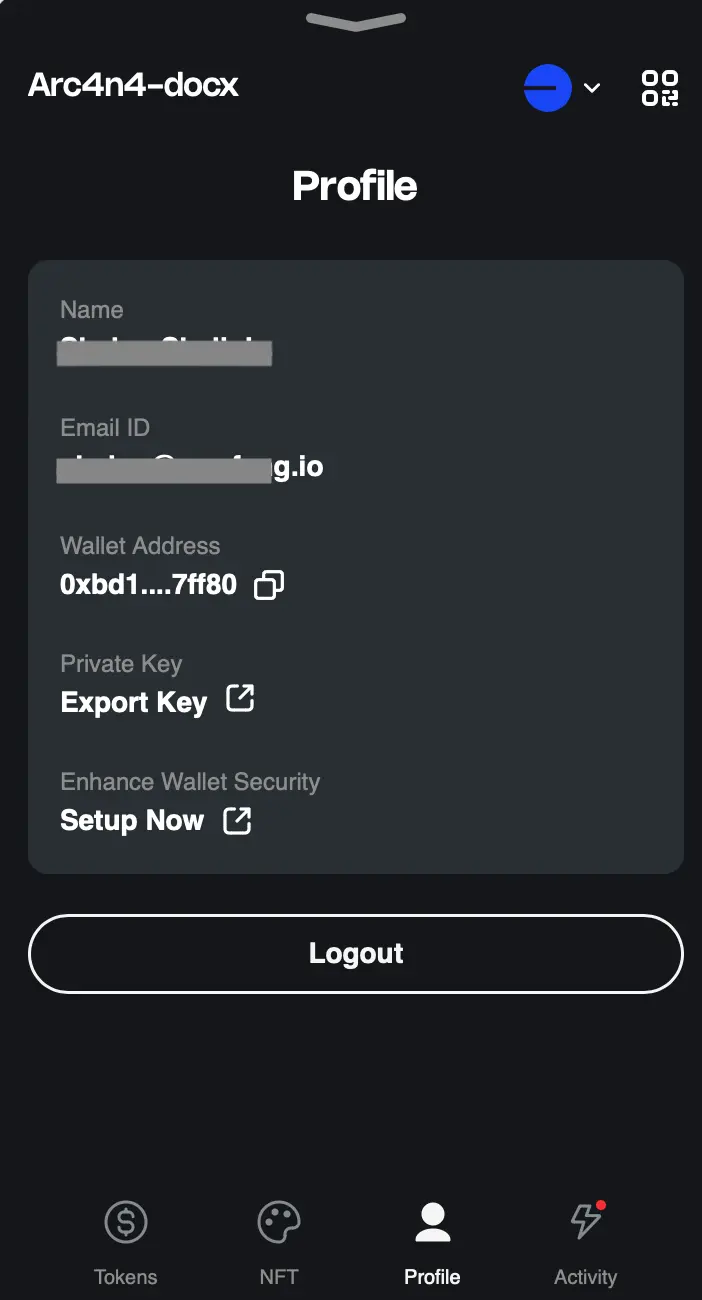
Export Private Key
Click the Profile ![]()
![]() tab on the bottom of the Arcana wallet to see the user profile screen and choose export private key option.
tab on the bottom of the Arcana wallet to see the user profile screen and choose export private key option.
Exporting MultiversX Wallet
For exporting the MultiversX Wallet, there is no private key export feature unlike EVM chains. The user must refer to the saved copy of the secret seed phrase (displayed on first user login) and recover or import the MultiversX wallet. Learn more...
View Status / Enable MFA
In the profile tab of the wallet, users can check the current MFA status, whether it is enabled or not. MFA is a one-time setting for the user's wallet. Click Set up MFA to turn on MFA by setting up security questions and a PIN. You will need to enter either of them to authenticate when you login to a new device or browser. Learn more...
Logout
To log out of the app and the wallet, click the Profile ![]()
![]() tab at the bottom of the Arcana wallet UI and select Logout.
tab at the bottom of the Arcana wallet UI and select Logout.
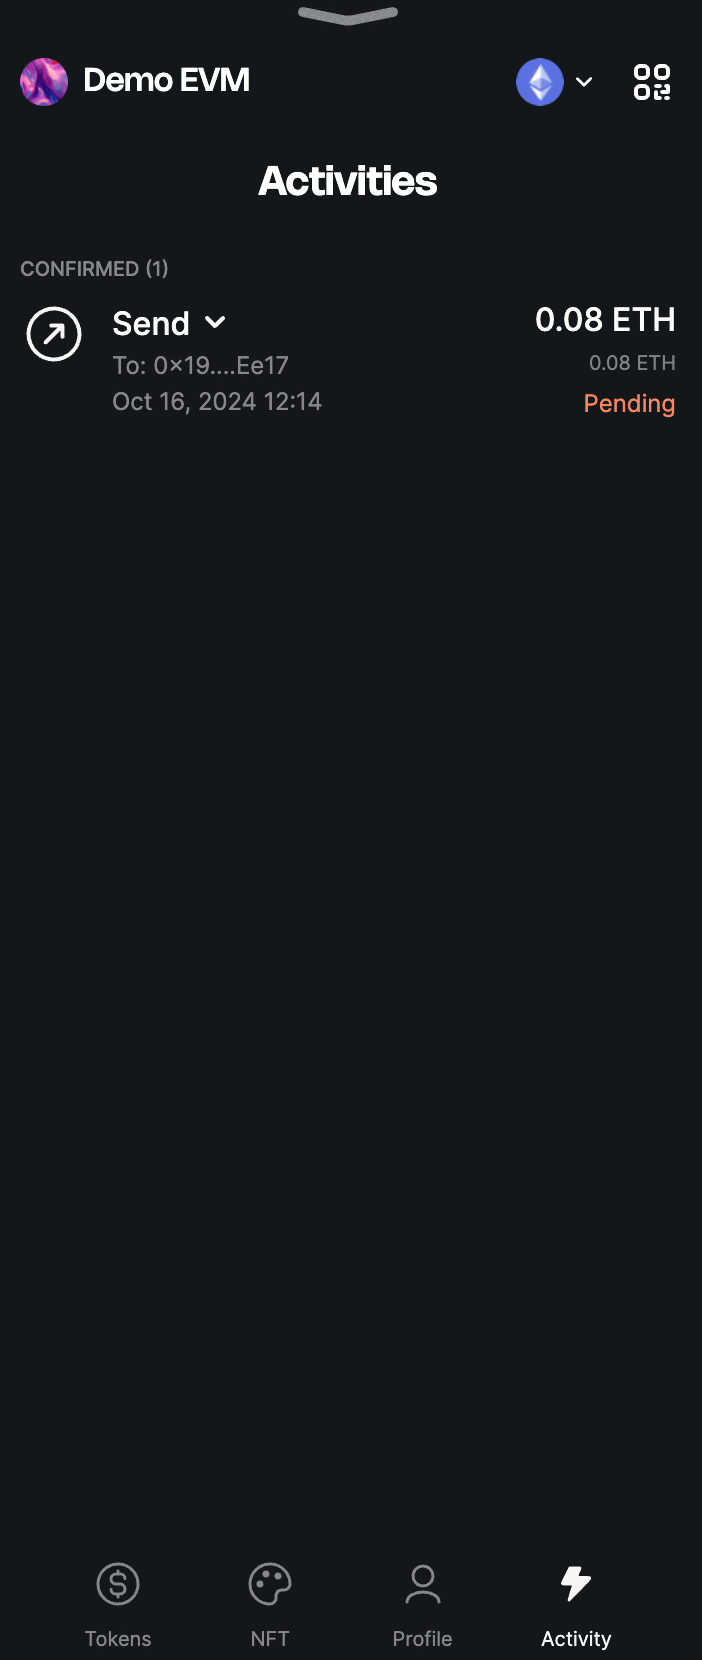
Transaction Activity
Click the ![]()
![]() 'Activity' tab on the bottom right of the Arcana wallet to view the activity screen. It lists any pending transactions and the status of the following user actions via the wallet:
'Activity' tab on the bottom right of the Arcana wallet to view the activity screen. It lists any pending transactions and the status of the following user actions via the wallet:
- Sell transaction
- Send tokens transaction
- Contract deployment

Notification Example
Pending Contract Deployment Request
A red dot on the ![]()
![]() 'Activity' tab icon at the bottom right of the Arcana wallet indicates a pending blockchain transaction.
'Activity' tab icon at the bottom right of the Arcana wallet indicates a pending blockchain transaction.
Click on the red dot to see details of the pending transaction and take appropriate action.
Pending Transactions
When a transaction notification appears, the user can click 'Do this later' to ignore it. Pending transactions are marked with a red dot in the 'Activity' tab and on the minimized wallet icon.
Once the user addresses the notification, it disappears from the 'Activity' tab.